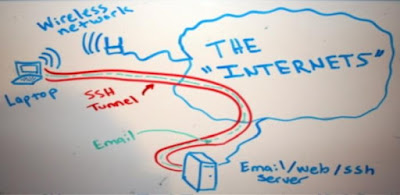
Today, I am Writing This Tutorial to explain you, how to remain 100 % Anonymous on internet through SSH tunneling.
So first thing first.
Secure Shell (SSH) is a network protocol for secure data communication, remote shell services or command execution and other secure network services between
two networked computers that it connects via a secure channel over an insecure network: a server and a client (running SSH server and SSH client programs, respectively)
two networked computers that it connects via a secure channel over an insecure network: a server and a client (running SSH server and SSH client programs, respectively)
If you were not able to under stand what was SSH. Then for you SSH is a computer networks use a tunneling protocol when one network protocol (the delivery protocol) encapsulates a different payload protocol. By using tunneling one can (for example) carry a payload over an incompatible delivery-network, or provide a secure path through an untrusted network.Tunneling protocols may use data encryption to transport insecure payload protocols over a public network (such as the Internet), thereby providing VPN functionality.
What we will do ?
What we will do is use a free program called Putty to connect to an SSH server that we have set up home. Then we will configure the machine that we are on to pass all web traffic through this encrypted connection and out through our home connection. Anyone listening in will only see one connection to your home IP, and the rest will be encrypted traffic. :)
Download Putty Client - Click Here
Step 1 – Configure Putty
After downloading Putty, launch it and in the left menu, go to Connection -> SSH -> Tunnels . On the right side, enter any port like i use port 9090 , put 9090 in the Source Port and select Dynamic from the radio buttons directly below it, then click Add.
It should now say D9090 in the box above.
Next, on the left side, go back to Session, and add a session profile for your home server by entering in the address under Host Name, ensure that SSH is selected underneath. Next, create a name for your profile, and enter it in Saved Sessions box and then click save. Finally, click Open at the bottom and log into your SSH server. thats it now you need to setup you browser
Step 2 – Configure Web Browser
Firefox
If you’re using the Mozilla Firefox web browser, you can configure it by going to Tools -> Options menu and then clicking Advanced on top and then select the Network tab and then Settings under Connection section.
On the Connection Settings windows, enter in 127.0.0.1 in the SOCKS Host box, and your port you selected earlier, in this case 7070. Ensure that SOCKSv5 is selected underneath. That’s it, now press OK until you are back at your browser window. You’re done.
On the Connection Settings windows, enter in 127.0.0.1 in the SOCKS Host box, and your port you selected earlier, in this case 7070. Ensure that SOCKSv5 is selected underneath. That’s it, now press OK until you are back at your browser window. You’re done.
Internet Explorer
If you are using Microsoft Internet Explorer then you can go to the Tools -> Internet Options menu. Click on the Connections tab and then LAN Settings down below. Now, on the Local Area Network (LAN) Settings page, but a check mark in the Use a proxy server for your LAN and in Bypass proxy server for local addresses and then click the Advanced button.
In the Proxy Settings page, enter 127.0.0.1 in the Socks box, and the port you selected in the box next to it, in our case 7070. Now, click OK until you are back at the web browser window.
Google Chrome
Unfortunately there is no native way of setting this up in Google Chrome. However, someone has created an extension for it that you will have to add yourself called Proxy Switchy! which you will have to add yourself.
Testing :D
The good thing about this setup is that you don’t have to configuration anything on the SSH Server side. To test your tunnel, just go to http://www.whatismyip.com and it should display the IP address of your home server and not your current physical location.
Credits:
wikipedia
That’s it, enjoy, and happy anonymous private browsing!


0 comments:
Post a Comment